- Published on
LowLevelLog: Chip8 Emulator
- Authors

- Name
- Tin Chung
- twitter@chungquantin
Language: English
To provide some background for this blog post, I've recently found myself deeply intrigued by various concepts within low-level programming. As a result, I've been actively engaging with individuals in the Rust community forum to satisfy my curiosity.
In a particular situation, I had the opportunity to collaborate on a side project with a like-minded programmer from France named Loick. Our shared passion for low-level programming brought us together, and Loick embodies the type of engineer I've been seeking ever since my freshman year of programming. He's the kind of programmer who's motivated by the pursuit of technical understanding rather than purely monetary gain.
I want to make it clear that I don't view making money through programming as inherently wrong, but I believe that it should not be the sole driving force behind one's endeavors.

It's great to make friends with someone who is on another side of the globe, isn't it? So the guy inspired me to dig deeper into a kind of thing I have never tried before, the emulator.
What is the emulator?
There are multiple types of emulators but the most familiar emulators to me are game console emulators and mobile phone emulators. Those attached to my life since childhood, from playing games on the 3DS emulator to developing mobile applications.
You can consider an emulator as software that mocks (or emulates) electronic devices. For example, in a console gaming context, you could not play Nintendo Switch games without a Nintendo Switch. The reason is Nintendo designed the Switch hardware architecture and OS differently compared to what you got on your MacOS or Windows. Hence, Nintendo Switch games can only be loaded and executed by the Nintendo Switch.
To provide the capabilities of playing Nintendo Switch games on MacOS, technical folks made Nintendo Switch emulators that have a matched hardware specification and instruction set executor to handle the provider games.
What is Chip8?
CHIP-8 is an interpreted programming language, developed by Joseph Weisbecker made on his 1802 Microprocessor.
Those high-level languages are designed to be close to the human language - English. Chip8, is quite similar to assembly with bunches of instructions that are just higher than the machine code but still low enough for you to not understand easily.
If you search the keyword Chip8 on Google, there are bunches of projects (most are emulators and interpreters) made for getting started in low-level programming. It is not hard to understand but provides a good set of instructions for you to be familiar with system programming.
Development of the CPU
So let's get started with this joyful project, we gonna make a control processing unit (CPU) to handle the instruction cycle of the Chip8 program. Here are a few materials that you can use to expand your knowledge about Chip8, these are also resources I read to implement this project
Because the emulator is a virtual machine running on top of another machine, Let me break down the components you need for the CPU and how it works under the hood.
Instruction Cycle: Fetch -> Decode -> Execute
Every ISA computer follows the same cycle for handling instructions. The first stage is fetching the instruction from the memory. As I mentioned, the emulator is a virtual machine that runs as a program on your machine, we also need to virtually implement the memory stack, stack pointer, program counter, register, memory address pointer...or I can say, most of the data structures and variables that the CPU requires.
fn read_word(memory: [u8; 4096], index: u16) -> u16 {
    (memory[index as usize] as u16) << 8
        | (memory[(index + 1) as usize] as u16)
}
How to load and run a program?
Program binary code
This is interesting but fundamental knowledge about programming, so if you don't know, a program is just a bunch of binary 0 and 1 (ROM), these binary codes will be sent to the CPU to flip-flop the state of logical gates. Every computer chip has a specific instruction set architecture, some are classified as RISC (Reduced Instruction Set Computer), CISC (Complex Instruction Set Computer), or other variants (Wikipedia - Instruction Set Architecture).
Decode to instruction
You may heard about 16-bit programs, 32-bit programs, or 64-bit programs once in your lifetime. To break it down, a 16-bit program means the instruction has a format 0000 0000 0000 0000, in the hexadecimal format, it will be 0xabcd, that is only compatible with computers that support the 16-bit instruction set.

After decoding the binary code, we will process it by pattern matching with the operation code declared in the instruction set of the Chip8 technical reference.
The original implementation of the Chip-8 language includes 36 different instructions, including math, graphics, and flow control functions.
Execute the instruction code following the Chip8 instruction set
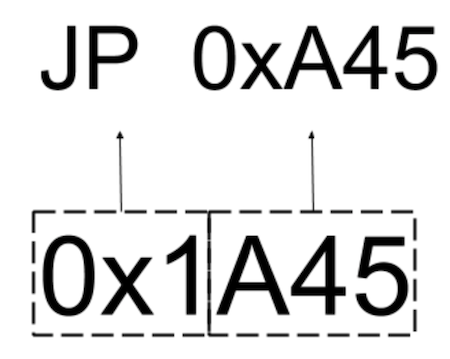
You may be confused about how to pattern-match the hexadecimal instruction code of the program with the one in the technical reference. I will use 1nnn - JP addr instruction as an example. The selected instruction means jumping to a specific nnn memory address.
In the above decoding stage, we got the format for our program instruction as 0xabcd each letter stands for 4 bits. Chip8 instruction set uses the first 4 bits of the instruction code as the identifier of the operation.
After understanding the structure of the instruction code, we only need to process and implement an appropriate method for each instruction following the technical documentation.
let op_1 = (opcode & 0xF000) >> 12;
let op_2 = (opcode & 0x0F00) >> 8;
let op_3 = (opcode & 0x00F0) >> 4;
let op_4 = opcode & 0x000F;

match (op_1, op_2, op_3, op_4) {
    // CLS
    (0, 0, 0xE, 0) => self.display.cls(),
    // JP
    (0x1, _, _, _) => self.pc = nnn,
    // LD Vx, Vy
    (0x8, _, _, 0x0) => self.v[x] = self.v[y],
    // ...
    (_, _, _, _) => ()
}
What does (op & 0xF000) >> 12 mean?
To understand the above statement, you will need to learn about the concept of bit-masking. Each instruction contains a pattern that will always be the same and the variables of the instruction are the dynamic elements. The JP instruction above 1nnn - JP addr has nnn as the dynamic element and 1 the static identifier of the instruction. But then how can we retrieve nnn from the instruction? The solution is bit-masking.
To mask the instruction and retrieve the variables, we use a bitwise AND operation and match it to the pattern. To get nnn from 0x1nnn, we will need a mask 0xf000 or 1111 0000 0000 0000 in 16-bit binary format.
What about >> 12 ?
12 means right shift by 12 positions. This means that the result of the bitwise AND operation is shifted 12 positions to the right. The result will be the least significant 4 bits of the original 160bit value
So the final answer we get from the statement above is 0x1nnn => 1
Conclusion
I already covered the overall idea of how to handle the instruction cycle for the Chip8 emulator. However, to implement all the functionalities of each operation, it is not suitable in the context of this blog. You can follow the technical reference and implement it on your own, which is also a good practice.